Getting Started with Robot Operating System
What is ROS?
ROS (Robot Operating System) is a BSD-licensed system for controlling robotic components from a PC. A ROS system is comprised of a number of independent nodes, each of which communicates with the other nodes using a publish/subscribe messaging model. For example, a particular sensor’s driver might be implemented as a node, which publishes sensor data in a stream of messages. These messages could be consumed by any number of other nodes, including filters, loggers, and also higher-level systems such as guidance, pathfinding, etc.
ROS is best thought of as a collection of tools and frameworks that make automating robotics projects much easier for someone who is absolutely new to it. Every ROS project has a specific structure that must be followed. It would be your responsibility to fill in the automation code and define how the various components of your code communicate with one another. After that, the underlying ROS framework handles the networking and connectivity.
Resources : Youtube Tutorials
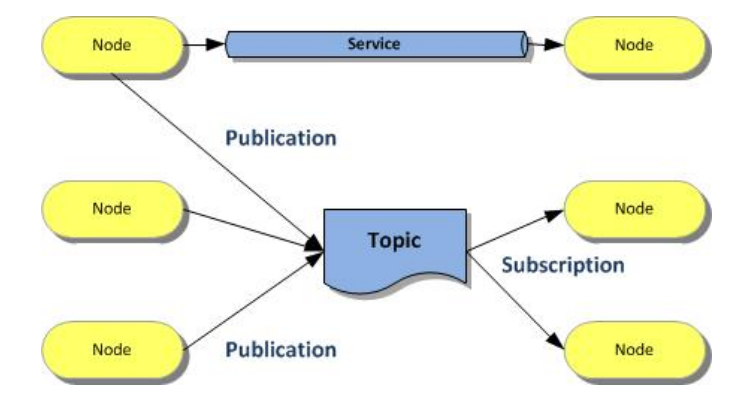
A ROS system can be visualized as a graph where all the vertices are nodes and the edges between them are known as topics. In simple terms nodes are programs that perform a particular task and send out/receive data in the form of messages. These messages are exchanged between two nodes over the topic (edge) connecting them.
Why ROS?
Note that nodes in ROS do not have to be on the same system (multiple computers) or even of the same architecture! You could have a Arduino publishing messages, a laptop subscribing to them, and an Android phone driving motors. This makes ROS really flexible and adaptable to the needs of the user. ROS is also open source, maintained by many people.
Basic Terminologies and Commands
Nodes: A node is an executable file (could be python or C++) which performs a specific task and communicates with other nodes through topics.
Topics: Topics and are ways of communication between nodes. They depend from each node (see node definitions). Services rely on a query made by a given node or from terminal, getting a response from the node offering the service. ROS messages have to be specially defined for each user defined topic. Apart from the standard message types that come with ROS like string, int32, etc. you can also define your custom message types in ROS for custom uses.
Resources : Go through ROS wiki on Topics to know more.
- Note: A single node can simultaneously act as a subscriber to one topic and a publisher of another topic and a server for one service and the client for another.
Packages: Packages are used to organise all of ROS’s coding and software. ROS Nodes, libraries utilised in those codes, message and service definitions, as well as any dependencies, may all be contained in a package. Two files, CMakeLists.txt and package.xml, will be used throughout our workplan once we create the package. There is a separate directory src from these files. The code for the package’s ROS nodes is stored here (as mentioned before, nodes are nothing but programmes that perform specific tasks). It must be built after the ROS package is created before it can be used.
Resources :
- Go through catkins method of creating ROS Packages
- Go through ROS wiki Package Building Tutorial
Catkin: Catkin is the build system used for ROS.catkin is the ROS build system: the set of tools that ROS uses to generate executable programs, libraries, scripts, and interfaces that other code can use. If you use C++ to write your ROS code, you need to know a fair bit about catkin. To build packages you must have a catkin workspace where all your projects are contained. You will have to use it to build not only yours but any other packages that may be in your workspace. A catkin workspace or package can be built running either of these two commands : catkin_make or catkin build in the root of your catkin workspace.
Resources :
-
Catkin wiki page and Catkin conceptual overview to learn more about catkin.
-
Note: The command used to build a workspace should be consistent every time; for example, if the workspace was built using
catkin makethe first time while initialising it, all subsequent builds should usecatkin make. To change the build process in an existing workspace, run the commandcatkin clean, which will remove everything but the workspace’s source space (src folder). The desired command can then be used to rebuild it.
Workspace: A ROS workspace is just a hierarchical directory where all of your linked ROS codes are stored. A workspace has packages, which contain, among other things, the code for nodes. On your computer, you can have numerous workspaces, but you can only work in one at a time.
Resources :
Colcon: Colcon is another build system just like catkin. It comes with a vast array of features which can be used to organise your workspace. Similar to catkin, to build a workspace, you need to run colcon build in the root of the folder your workspace.
Resources :
- Go through Colcon documentation for complete overview.
Publisher-Subscriber Model
Two nodes can exchange data in the form of messages asynchronously, usually used when a one way stream of information is involved.The object of a ROS node which publishes the data in the form of messages over a topic is called Publisher. The rate of publishing of messages can be defined by user. The data published by the publisher of one ROS node can be received through the object of a ROS node called Subscriber.
Resources :
Client-Server Model
Another common mode of communication, especially suited when there is a transaction style relationship between the two nodes is the service - consisting of a server and a client. The node which sends requests to a server is called Client. A special function that acts as a proxy between the client and server can be created. When called, the function sends a request to the server with the arguments passed to it as parameters. The node which constantly monitors for requests from the client is called Server.It does the required task independently of the client and returns the response when the task is completed.
Resources :
ROS Master: It is a central server to which all nodes are connected by default. It allows any node to look up information about any other node, essentially it is needed for connecting nodes within the system. A node gets the network address of another node from ROS Master.
rosrun: On starting the ROS Master one can now start their own ROS nodes. For this ROS has a special command called rosrun which lets you run the executable files for their own node from anywhere by running following command (replace
rosrun <package_name> <executable_name>.py
Note :
- If using python, before attempting to run any ROS nodes that you have written, make sure that you have given executable permission to the code files. For more info on linux file permission look here by running the following command (replace
appropriately) : -
chmod u+x <executable_name>.py
- When one runs
roscoreor their own ROS node, the terminal is held until it is terminated. As a result, if you are running many nodes, each one must be run in a different terminal window. In such scenario terminator comes handy.
roslaunch: There can be a lot of nodes in a ROS project, and launching them one by one can be a pain. roslaunch is a command that uses launch-files to launch a certain set of nodes all at once in a single terminal. These files usually contain a list of nodes and other related info and are generally stored in the launch directory inside a package.
Resources :
roscd: roscd is a command line tool which allows you to navigate or cd (change directory) to (in command line terms) a package without knowing its exact path. Note: The workspace in which the package is present needs to be sourced. E.g. If you wish to navigate into the turtlebot3_gazebo package you’ll just type the following command in the terminal:
roscd turtlebot3_gazebo
rqt_graph: Once you have your system running, you can obtain a diagram along with other details of the system by running the rqt_graph command in another terminal window.
General Understandings
ROS starts with the ROS Master. The Master allows all other ROS pieces of software (Nodes) to find and talk to each other. That way, we do not have to ever specifically state “Send this sensor data to that computer at 127.0.0.1. We can simply tell Node 1 to send messages to Node 2.
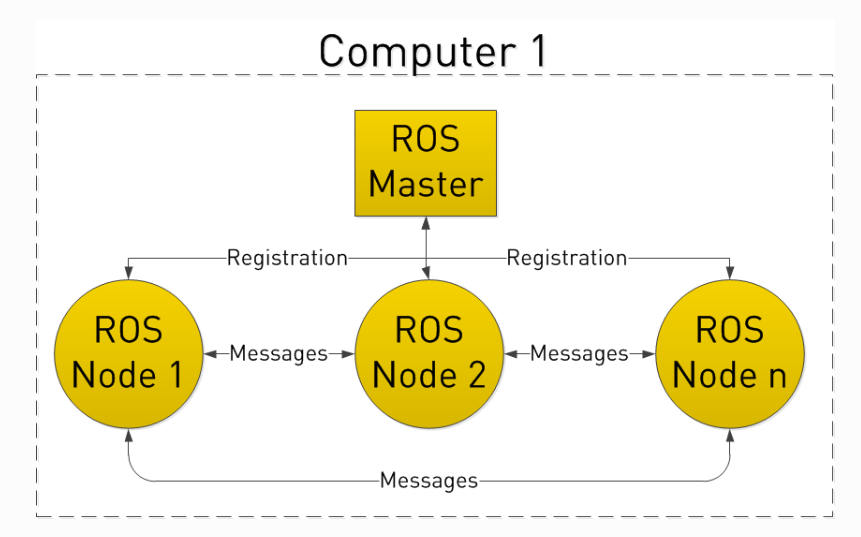
Nodes do this by publishing and subscribing to Topics.
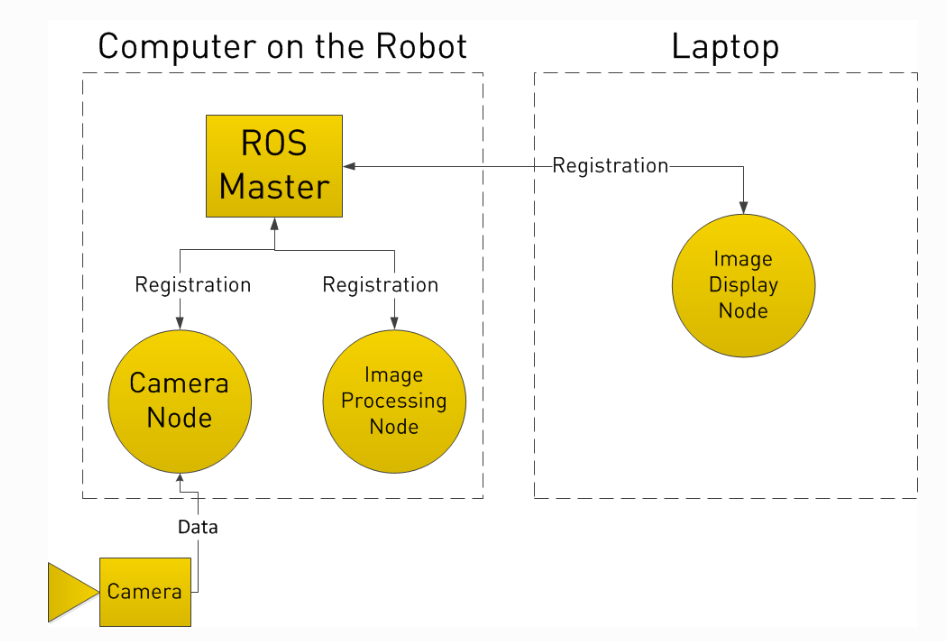
Let’s say we have a camera on our Robot. We want to be able to see the images from the camera, both on the Robot itself, and on another laptop.
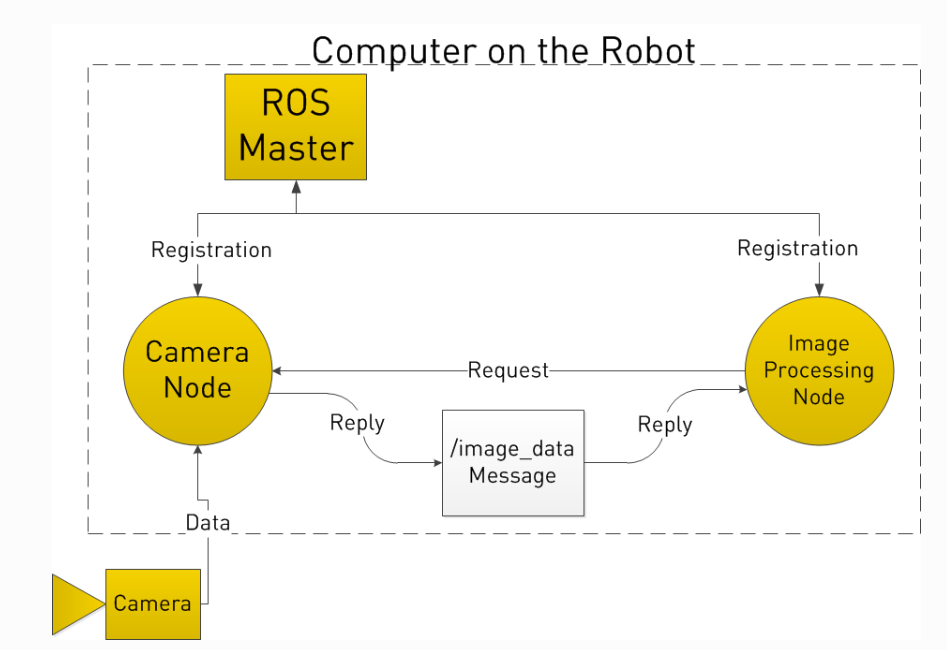
In our example, we have a Camera Node that takes care of communication with the camera, a Image Processing Node on the robot that process image data, and a Image Display Node that displays images on a screen. To start with, all Nodes have registered with the Master. Think of the Master as a lookup table where all the nodes go to find where exactly to send messages.
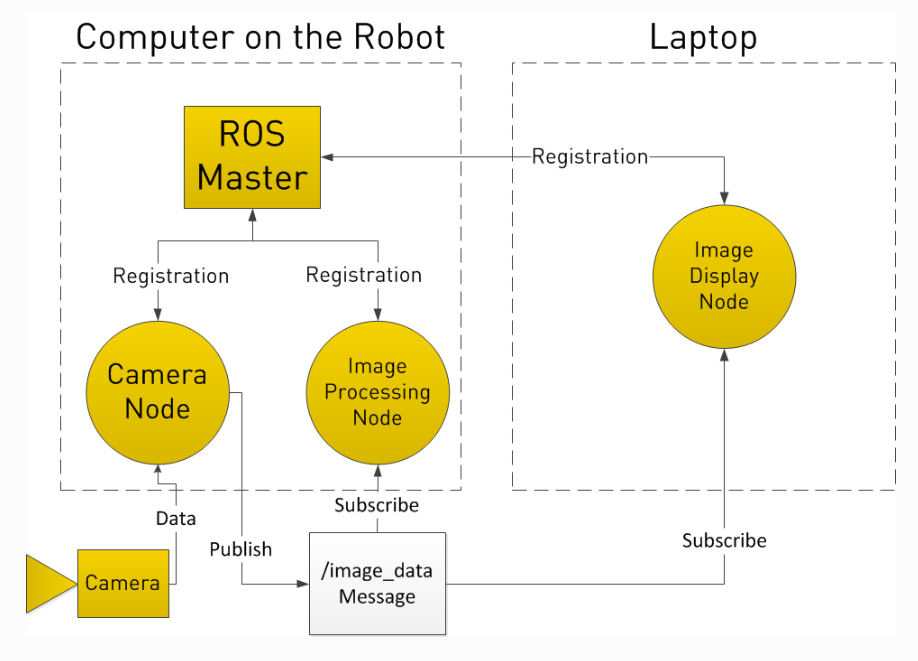
In registering with the ROS Master, the Camera Node states that it will Publish a Topic called /image_data (for example). Both of the other Nodes register that they areSubscribed to the Topic /image_data.
Thus, once the Camera Node receives some data from the Camera, it sends the /image_data message directly to the other two nodes. (Through what is essentially TCP/IP)
Now you may be thinking, what if I want the Image Processing Node to request data from the Camera Node at a specific time? To do this, ROS implements Services.
A Node can register a specific service with the ROS Master, just as it registers its messages. In the below example, the Image Processing Node first requests /image_data, the Camera Node gathers data from the Camera, and then sends the reply.
ROS Parameters and Parameter Server
A parameter server is a collection of values or parameters that nodes can retrieve or modify during runtime in response to requests made via command prompt, nodes, or launch files. Parameters are static, globally accessible values such as integers, floats, texts, and boolean values that can be saved separately or within a YAML file. Nodes may readily check the configuration status of the system and make changes if necessary because parameters are supposed to be gloablly accessible.
Accessing and setting Parameters
Via command line
Parameters can be accessed, modified or deleted using the rosparam command line utility in the rosbash suite of terminal commands.
- To list all the parameters :
rosparam list
Or to list all the parameters in a specific namespace :
rosparam list </namespace>
- To assign a value to an already existing parameter or to set a new one :
rosparam set <parameter_name> <parameter_value>
Note : You can also load the parameters into the parameter server from a YAML file using
rosparam load <filename> <namepsace>
- To get/read a parameter value :
rosparam get <parameter_name>
Note : You can also dump/save the parameters into a YAML file from parameter server using
rosparam dump <filename> <namespace>
For more insights regarding the rosparam tool refer to ROS wiki.
Via the rospy API library
Parameters from the parameter server can be accessed and modified using rospy API library. This is generally used when the parameters are to be used by a node during the runtime.
For more imformation on handling parameters using rospy API library go through rospy overview
Via launch files
Parameters can be set, created and loaded into the parameter server while creating launch files. For more information on handling parameters in launch files go through roslaunch wiki.
For more information go through ROS wiki on Parameter Server
Learning Materials
- A Gentle Introduction to ROS by Jason M.’O Kane (use IIT BBS email-id to access link)
- Programming Robots with ROS by Morgon Quigley (use IIT BBS email-id to access link)
- Official ROS Tutorials.